Monday 29 September 2014

Save View as an Image

If you have created a view of your model that you would like to keep for future reference you have 2 options.

The first option is to keep the image inside your Revit Project.

  • If you right click on the view in your project browser, and then you choose ‘Save to Project as Image’. This will bring up a dialog box where you can adjust the view settings. Once you have defined the settings, if you hit ‘OK’ this will create an image of the view and save it in the ‘Renderings’ section of your  Project Browser.


 The other option is to Export the image to outside of the Revit Project.

  • If you click the Revit Application Button (top left hand corner) Export Images and Animations Image. This will bring up a dialog box where you can adjust the view settings. Once you have defined the settings and given it a save location. The image will be created outside of your project.


Thursday 25 September 2014

Project Browser Searching

Ever had too many Views, Sheets, Families, etc…. in your project browser, and it is really hard to find the one that you want? This is where a good naming strategy comes in handy, because you can search your project browser.

If your right click on any of the headings in your project browser, you will see that you have a search option, just type in a keyword in the name that you want and it will highlight in the project browser. (You can actually right click on anything in the Project Browser to get the same function, the Search is just down the bottom of a longer list of options)


Wednesday 24 September 2014

Phase Mapping

When you are working with Phases and Linked models, you need to make sure that all the phases correspond with one another. This means that there should be the same number of Phases in you linked models as well as your project model, and the naming convention should match.

To verify your phase mapping…..

  • Select the Linked Model (in a view where it is visible)
  • Go to the Edit Type Properties
  • Click the Edit button next to the Phase Mapping


This process can get a little more complicated working with consultants, but with good model management and communication, a streamlined mapping of phases can be achieved.

Monday 22 September 2014

Copy and Paste from Linked Files

When you have linked models loaded into your project model, if there is a family you would like to use in the linked file, all you have to do is use the ‘TAB’ button and select the family and then press the ‘copy to clipboard’ tool and then press the ‘paste from clipboard’ to load it into your current project. Easy as that, no need to hunt the family down in a project library….


Sunday 21 September 2014

Tagging in Legends

This is a reminder of some of the limitations that Revit has when you are documenting your projects.

Creating visual Legends in your project is a great way of representing your components, but they do have their limitations. If you want to tag or keynote these elements you find that the only tag or keynote that you can use is the Material Tag or Material Keynote.


The other Tags and Keynotes are visible, but you will not be able to place them in a Legend view.

A workaround for this process is to create a shared material parameter that can be loaded into a Material Tag family and then loaded into your project and assigned to the material of the component. This will bring back some of the functionality of Tagging. I don’t like using workarounds but sometimes it is your only choice…..

Thursday 18 September 2014

Naming Parameters

When naming parameters in your Revit project or family files, we should try never to use symbols in the name. These include the addition ‘+’, subtraction ‘-‘, multiply ‘*’, divide ‘/’, and even the bracket ‘()’ symbols. Revit will allow you to add these symbols to the name but problems can follow later if you start to write formulas.


When you start to create formulas, this is where Revit will start throwing up errors and you will end up not being able to save your dialog box. The names conflict with Revit’s mathematical processes.


So to be safe, try never to add symbols to your Parameter names.

P.S. There are other mathematical statements that can cause conflicts too, like ‘if’and 'not'…… 

Monday 8 September 2014

Extracting In-Place Famalies

Although you rarely need to create In-place Families, there is the occasion where the Project model layout will assist in the set out of your family. Here are a couple of easy ways to create a family while using the project to layout its extents without having the result being an In-Place Family. The trick is to start the family in the project model as an In-Place Family and then extract it to an External Component Family. This can be done using 2 methods.

Method 1: Extracting using Cut and Paste.

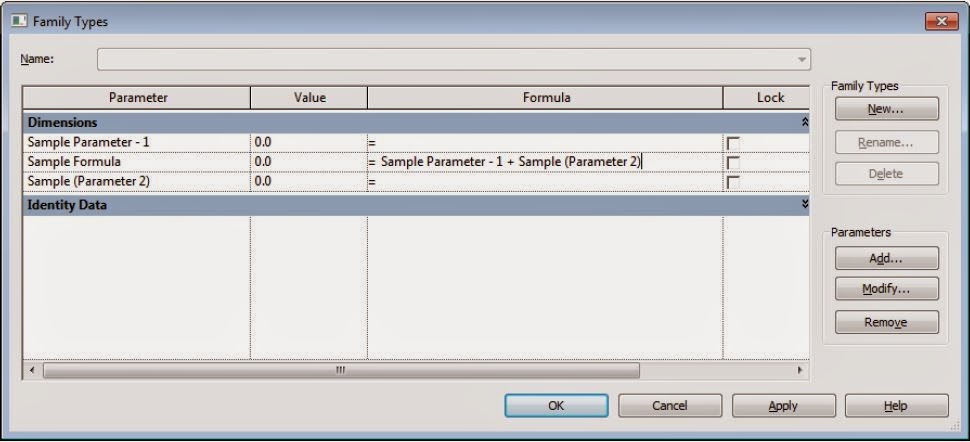
When you are creating the in-place family, you first need to pick a Category, give it a name and then you are in the Family editing model, where you can create the modelled family elements. Once you have finished creating the modelled components, before you hit the Finish Model Tick Icon. Just select everything in the in-place family and cut the element out of you model using the ‘CTRL’ + ‘Z’.

Then Go to Revit Application Button and Start a new family, picking the correct template file for your family.


Then simply Paste (‘CTRL’ + ‘V’) the modelled elements into the new family, position them correctly and Save the new family, and now you have a new External Component Family.

Method 2: Extracting using Groups.

Create you model as previously outlined. Then before you finish the model, Group all of the elements, Select the Group and then go to
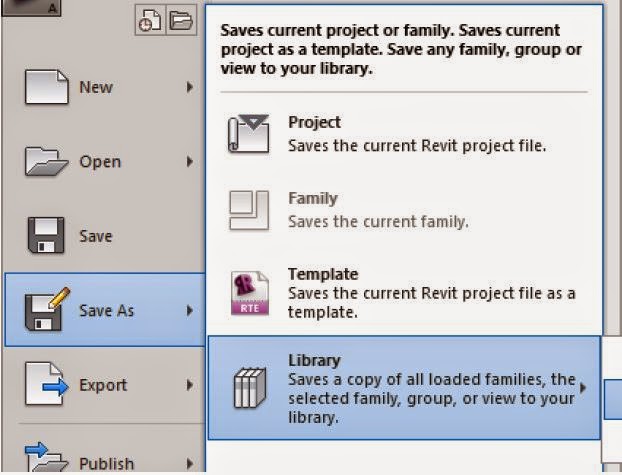
 the Revit Application Button Save As Library Group


You will notice that in the file type is saved as family (.rfa).


Now you can save it as an External Component Family.

Both of these methods will result in an External Component Family without having to fill you model with In-Place Families.


Sunday 7 September 2014

Working Views

In your Revit model we create plenty of views of our model to convey our design. A lot of these views are locked down with view templates and view filters to keep them uniform for documentation purposes. This can make it more difficult to carry out normal day to day modelling changes.

An easy way to have a view free from any constraints is to have a working view, this is your messy view, where you can have detail lines, temporary sections, no visibility constraints. These views will never be placed on sheets, so they are free from normal view constraints.

Better still they can be contained in the own section in the project browser.


To set up these views…..
  • Just duplicate an existing view      
  • Rename the new view by prefixing it with a ‘w.’ (this keeps the View Name unique)
  • Then change the View Type to Working. (or create a New Type if it isn’t there)


Thursday 4 September 2014

Purging Families

When you are creating Families for your Revit Projects, always remember to purge your families after you have created them. This will really help in your Project file as all of the extra unused information can quickly add up over the life of a project.

Don’t forget about the nested families too, no point purging the parent family without also doing the nested families.

The purge button is located under the Manage Ribbon.


Monday 1 September 2014

View Templates

Applying View Templates to views is a great way of keeping your model views looking uniform, but keeping track of your view Templates can sometimes be a bit of a task. Here are a couple of tips to help keep track of your view Templates.

To see what View Templates have been applied to Views. Just select the View Ribbon View Templates  Manage View Templates